The main reasons behind your Char-Broil grill’s low flame problem are:
- A low or overfilled propane tank.
- Gas leaks along the hose or connections.
- Regulator problems, either stuck or faulty.
- Air intake blockages that restrict oxygen flow.
- Damaged or faulty burners.
The good news is that none of these issues are impossible to fix. With the right tests and implementing the right fixes, you can get your grill heating properly again. Let’s dive in!
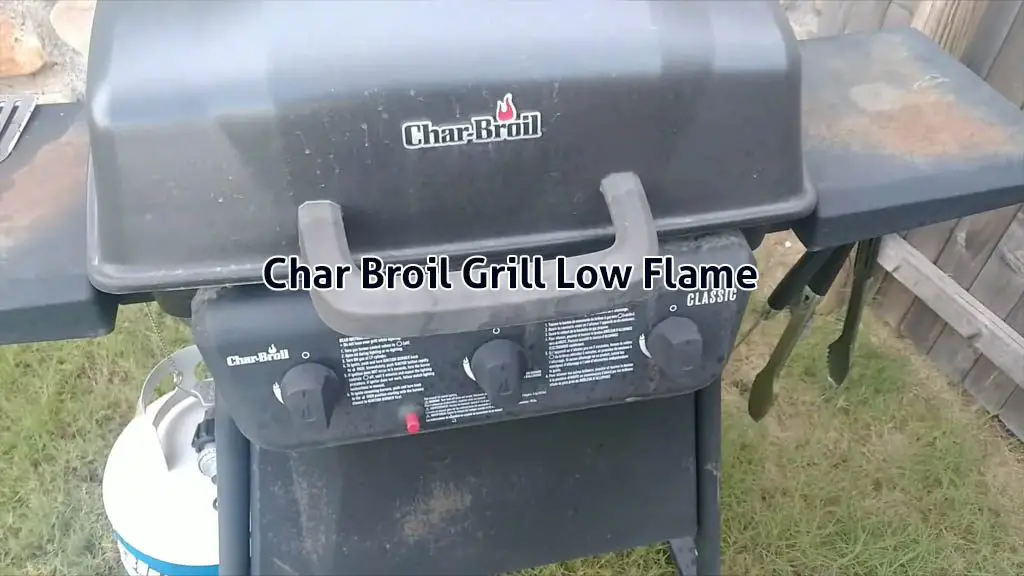
Char-Broil Grill Low Flame [7 Easy Fixes]
1. Low or Overfilled Gas Tank
Let’s start with the simplest and often overlooked reason your grill might not be heating properly. It’s the propane supply.
If the tank is empty, your grill won’t light at all. But if you’re only getting weak flames or unusually low heat, chances are the tank is either nearly empty or it’s been filled too much. Both situations can cause the same issue.
So how do you know which one you’re dealing with? Instead of guessing, you can test it yourself pretty easily.
Method 1: Check The Weight Of The Tank
Every propane tank has a “tare weight” (that’s the empty weight), usually stamped right on the collar. For most standard grill tanks, the empty weight is about 17 pounds, and a completely full tank comes in at around 30 pounds.
Here’s what to do:
- Place the tank on a bathroom scale.
- Compare the reading to the tare weight plus the fuel capacity.
If it’s close to the empty weight, you’re running low. If it’s way above what a properly filled tank should weigh, then it’s probably overfilled.
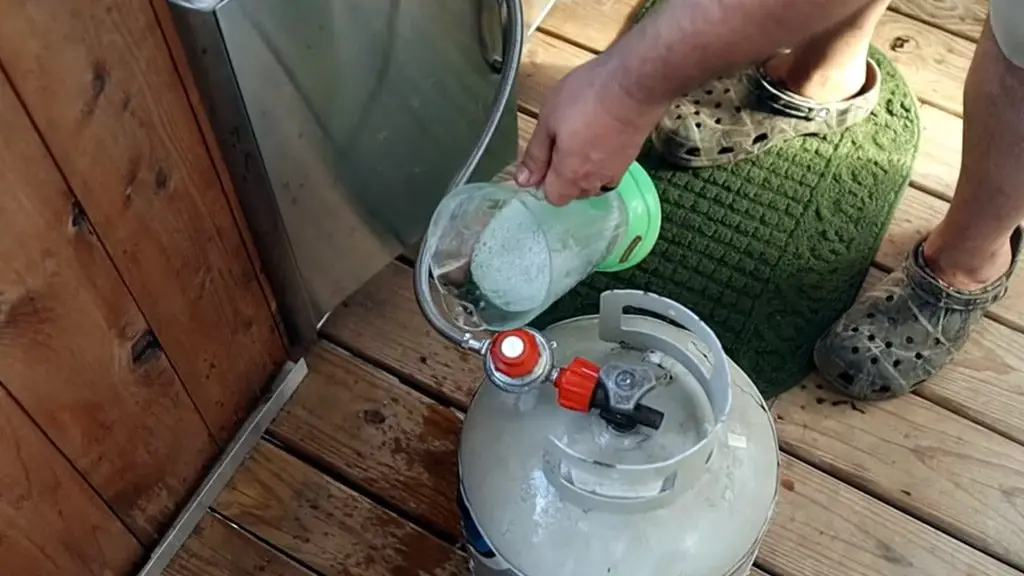
Method 2: Try The Warm Water Test
If you don’t have a scale handy, here’s another simple trick.
- Heat up some water until it’s warm (not boiling).
- Pour the warm water slowly down the side of your propane tank.
- Run your hand down the metal surface.
Wherever the metal feels cool to the touch, that’s where the liquid propane level sits. The area above will feel warmer. This won’t tell you the exact percentage left, but it gives a clear picture if you’re running low.
Method 3: Swap In A Spare Tank
The fastest way to confirm whether the tank is the culprit is to simply switch it out with a backup.
If the grill suddenly roars back to life with strong flames, you know the problem was fuel-related. It was either too little propane or a tank that was improperly filled. Either way, now you can easily solve it, as you’ve found the problem.
Keep in mind: If your tank is truly overfilled, don’t try to release propane on your own. It’s dangerous and often illegal. Always take it back to the station and let the professionals handle it.
Solution:
So what can you do if the problem is the fuel supply? Your two options are either to refill the tank or to swap out the tank for a new one. Here’s how they work:
Fix 01 – Refill The Tank:
Take it to a certified refill station. They’ll top it up to the safe 80% mark (leaving space for expansion). This is usually the cheapest option.
Fix 02 – Exchange the Tank With A New One
If you don’t want the hassle of refilling, just swap it for a new one at an exchange kiosk or hardware store. It costs a bit more, but it’s quick and easy.
Then, you can just connect the refilled or new propane tank to your grill, and you’ll be all set.
How To Attach The Tank To Your Char Broil Grill
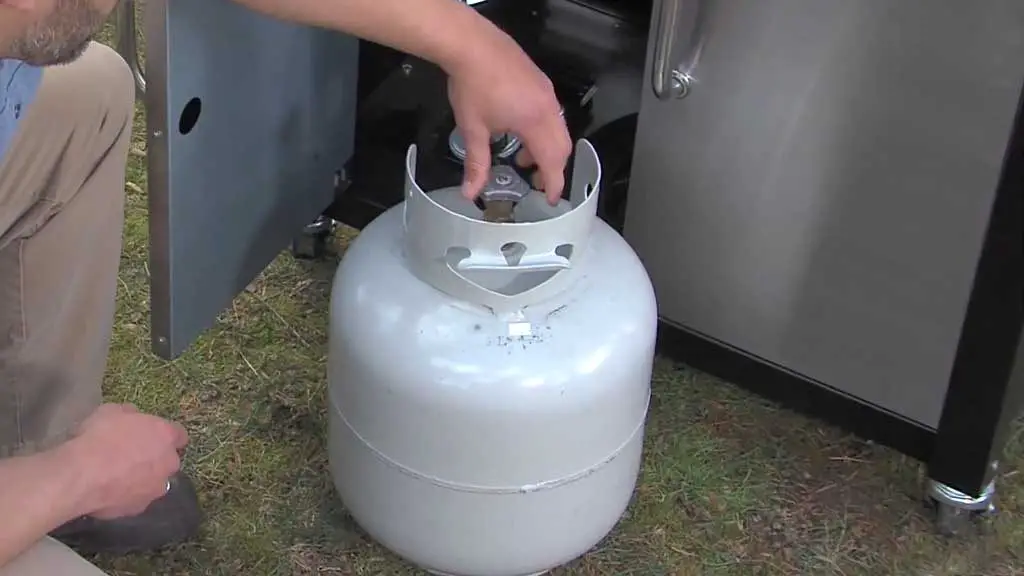
Once you’ve got a safe, properly filled tank, here’s how to hook it up:
- Make sure the valve on top of the tank is fully closed by twisting it clockwise.
- Double-check that all your grill’s control knobs are turned off.
- Remove any plastic safety cap or seal from the tank valve.
- Line up the regulator fitting with the valve opening.
- Hand-tighten the coupling nut by turning it clockwise until snug. Don’t use wrenches or pliers—hand-tight is enough.
Once connected, slowly open the tank valve. Opening it too quickly can trigger the safety shut-off. After that, turn on your grill burners and ignite, and you should be good to go.
My final word of advice is that it’s often handy to keep a spare tank around, especially if you grill often. That way, you’re never stuck mid-BBQ with undercooked food because of an empty or overfilled cylinder.
2. Gas Leak
If you’ve checked your propane tank and you know it isn’t empty or overfilled, but you’re still dealing with a low flame on your Char-Broil grill, the next most likely culprit is a gas leak.
This is a serious one, because not only does it prevent your burners from getting enough fuel to heat properly, but it also poses safety risks.
When gas escapes from the regulator, hose, or even a loose connection, the burners are starved of propane. The end result?
Weak heat output and a Char-Broil grill flame too low to cook your food the way it should. Worse, gas leaks aren’t just annoying—they’re dangerous. That’s why it’s critical to check for leaks before you continue grilling. Here’s how you can do a gas leak in a few easy steps:
Step 1 – Shut Everything Down
Turn off your grill completely and make sure all the burner knobs are in the “off” position. Close the tank valve tightly by turning it clockwise. This makes sure no gas is flowing while you set up the test.
Step 2 – Make a Soapy Water Mix
Grab a spray bottle or bowl, fill it with water, and add a few drops of dish soap. Mix it up until it’s soapy. This solution will help reveal any leaks.

Step 3 – Apply the Solution
Spray or brush the soapy water generously onto all the critical areas:
- The regulator connection
- The entire hose
- The point where the hose connects to the propane tank
- The point where the hose attaches to the grill
Step 4 – Open the Tank Valve Slowly
Once the soapy water is applied, open the propane tank valve just a little. Do not light the grill. This step is only to let the gas pressurize the hose and connections.
Step 5 – Watch for Bubbles
Keep your eyes on the spots you covered with soapy water. If you see bubbles forming, you’ve found a gas leak. The bubbles appear because escaping propane pushes through the soapy film. If you see this, shut off the valve immediately and don’t attempt to grill until the issue is fixed.
Solution:
If bubbles appear around a joint or fitting, the first thing to try is tightening the connection. Many times, a leak comes from something as simple as a loose coupler or nut.
But if the leak continues after tightening, the problem might be a cracked hose or a faulty regulator. In that case, replacement is the only safe solution. The hose is usually the most common part to fail, and swapping it out for a new one generally fixes the problem.
Before you fire up your grill again, repeat the soapy water test after the repair. If no bubbles appear, you can be certain your setup is safe and leak-free.
Quick Tip: Always keep an eye (and nose) out for unusual smells or hissing sounds around your grill. Catching a leak early can save you from frustrating low heat and keep you safe while cooking.
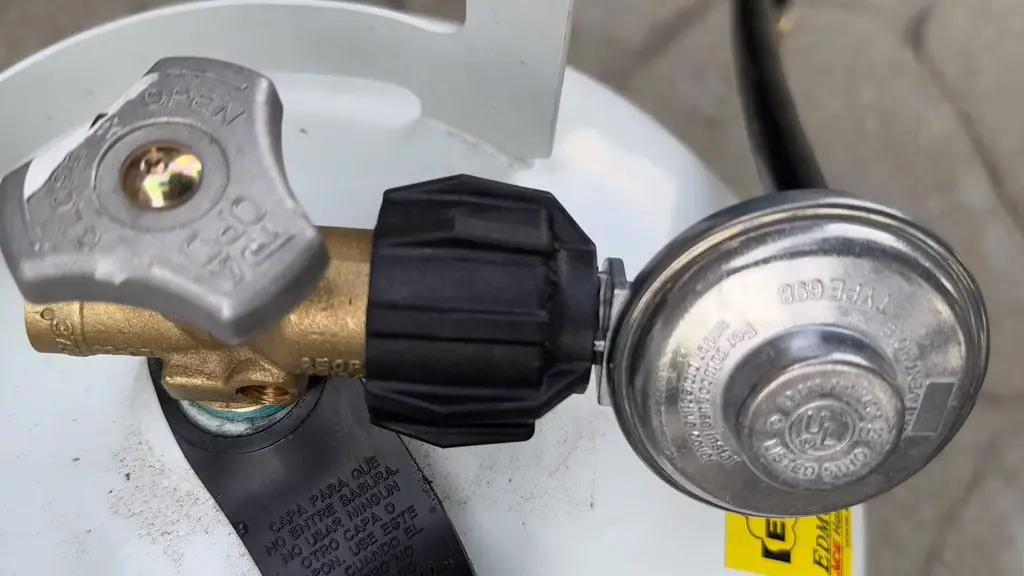
3. Stuck Gas Regulator
If you’ve already confirmed that your propane tank is fine and you’re still struggling with a Char-Broil grill low flame problem, the next place to look is the regulator. The regulator is the small device that manages the gas flow from your propane tank to the burners.

When it gets stuck, gas flow is restricted. That’s why even with a full tank, you may find your grill maxing out at only 250–300°F instead of climbing up toward 500°F. This is one of the most common signs of a bad regulator.
It’s also one of the reasons people often complain that the Char-Broil flame is low no matter what they try. The frustrating part? It can happen suddenly, especially with older models, and it leaves your grill unable to reach the heat you need for proper cooking.
The good news is, if the regulator being stuck is the problem, there’s a simple way to fix it without buying new parts.
Solution:
If you suspect the regulator is stuck, you can perform a reset. This method is often referred to as the “charbroil grill flame too low reset,” and it usually clears the blockage so the burners can get the gas they need.
How to Reset A Char Broil Gas Grill Regulator
Just follow these simple steps to do it:
- Turn off the propane tank and disconnect the hose.
- Open the grill lid.
- Turn all burner knobs to HIGH for 2 minutes, then switch them OFF.
- Reconnect the hose to the tank securely.
- Open the tank valve slowly and light the grill normally.
Once the reset is complete, check your temperatures. If the grill can now climb past 400°F and up toward 500°F, you’ve solved the issue. The Char-Broil gas grill regulator just needed a reset.
If the problem continues even after resetting, the regulator itself may be faulty and require replacement. Regulators do wear out over time, and swapping in a new one is often the only long-term solution.
Pro Tip: Always open the propane valve slowly after reconnecting. Opening it too fast is one of the main reasons the regulator locks up in the first place, causing that dreaded low flame issue.
4. Faulty Gas Regulator
If you’ve already tried a reset and the flames still won’t improve, the regulator itself may have failed. A damaged regulator restricts gas flow, which leaves you stuck with weak heat, no matter how much propane is in the tank.
That’s why many people struggle with a Char-Broil grill flame adjustment and never get the results they want. When the regulator is faulty, no amount of cleaning or resetting will bring it back to life.
But how do you know if your regulator is just stuck or faulty? It’s simple; you can perform a leak test straight on the regulator. Here’s what you should do:
- Mix a few drops of dish soap with water in a spray bottle.
- Apply the solution generously around the regulator housing and the connections where it attaches to the propane tank and the hose.
- Slowly open the propane tank valve—but do not light the grill.
- Watch closely for bubbles.
If bubbles form, that means gas is escaping and the regulator diaphragm or seals are failing. If there are no bubbles but the charbroil flame problem continues after a reset, that’s another sign the regulator itself is restricting flow.
Solution:
When the regulator is bad, the only real fix is replacing it with a new one. Follow these steps to replace it:
Step 1 – Safety First
Before starting, turn off the grill completely and shut the propane valve tightly. Make sure you’re in an open, well-ventilated space with no flames or sparks nearby.
Step 2 – Remove the Old Regulator
Using a wrench, disconnect the hose from the propane tank by turning it counterclockwise. If your regulator is also attached directly to the grill, loosen that connection too. Take care not to pinch your fingers—some fittings can be stubborn.
Step 3 – Attach the New Regulator
Confirm the replacement matches the original regulator in size and threading. If you have Teflon tape, wrap a layer around the fitting that connects to the grill side (not the tank side). Then:
- Screw the new regulator onto the grill fitting and tighten until snug.
- Connect the other end to the propane tank, turning clockwise until firmly secured.
Avoid leaving it loose, but don’t overtighten either—a snug fit is perfect.
Step 4 – Check for Leaks
Slowly open the propane valve. If you hear hissing or smell gas, shut it off immediately. To be certain, spray a little soapy water on the connections. If bubbles form, you’ve got a leak and need to retighten until sealed.
Step 5 – Test the Grill
Once everything is secure, light the grill as usual. If the regulator was the issue, you should now be able to adjust the flame on the Char-Broil grill smoothly and get your burners climbing back to high temperatures.
If your Char-Broil low-flame problem continues even after replacement, it’s possible that another part of the grill is at fault. But in most cases, installing a new regulator solves the issue and restores full heat.
Remember that regulators wear out over time. If you use your grill often, expect to replace the regulator every few years to avoid sudden flame problems mid-cook.
5. Blocked Air Intake
If you’ve ruled out fuel supply and checked for leaks, but you’re still wondering how to fix a low flame on a gas grill, another common culprit is the air intake. Your burners need a proper mix of gas and oxygen to burn hot and steady.
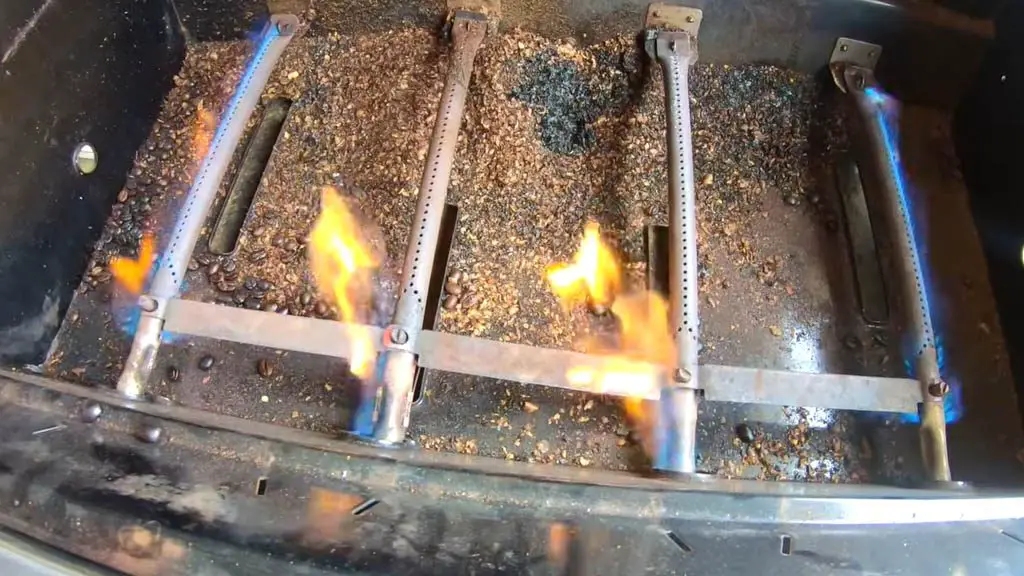
When the air intakes get clogged with dirt, grease, or even spiderwebs, the burners are starved of oxygen and can’t produce strong flames.
This is a sneaky issue because it doesn’t always stop the grill from working. Instead, it leads to weak flames, uneven heating, or a flame that flickers and looks unstable. In many cases, the flame color shifts from blue to yellow. That’s a telltale sign of poor airflow and an imbalanced gas-to-air ratio.
Since airflow is part of the combustion process, dirty or blocked intakes can make it look like other Char-Broil grill low-flame parts are failing when really it’s just an airflow issue. Follow these simple steps to know if this is an airflow issue:
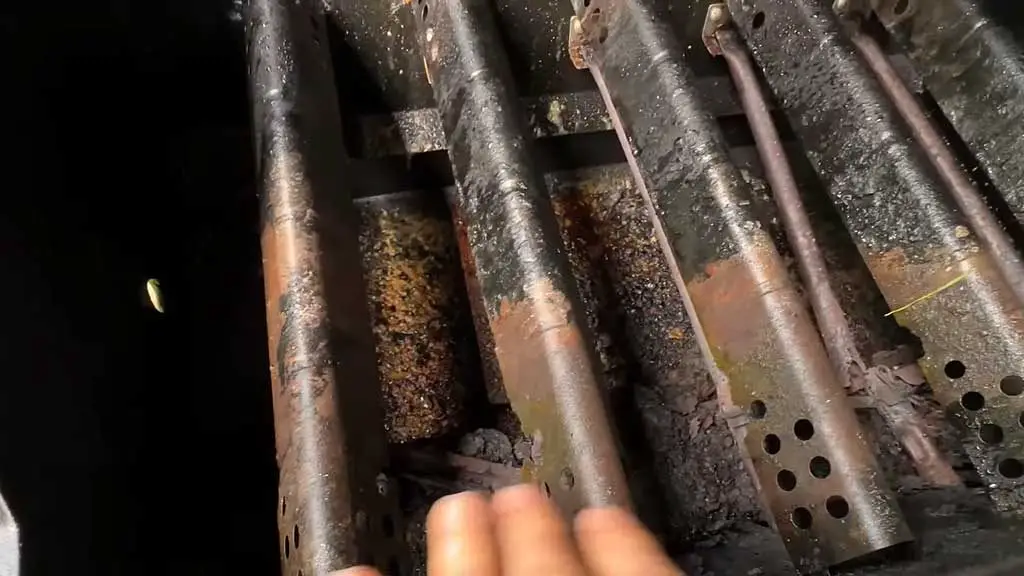
Step 1 – Locate The Air Intakes
The intakes are usually found where the burner tubes connect to the control valves. Look for small vent holes or slots in the burner assembly—that’s where air mixes with gas before ignition.
Step 2 – Inspect For Blockages
Check closely for grease buildup, rust, dirt, or even insects that might be blocking the openings. Any obstruction here will limit oxygen flow and weaken your flame.
Step 3: Look At The Flame Itself
A strong, healthy flame should burn blue and steady. A weak, sputtering yellow flame signals a dirty or blocked intake. Flickering flames that don’t stay consistent can also mean airflow issues. Depending on the results, you have to see whether it needs a cleaning.
Solution:
If you see a sputtering or flickering flame after doing the test, you know that the airflow needs cleaning. Follow these simple steps to do it:
- Turn the grill off and disconnect the propane tank for safety.
- Use a small brush, pipe cleaner, or even compressed air to clear out the venturi tubes and intake holes.
- Make sure no debris is left behind.
Reconnect the tank, light the burners, and watch the flame. If the flame is steady, blue, and reaches higher temperatures, you’ve solved the issue.
As a caution, remember that keeping the air intake clean not only restores proper heating but also prevents future problems with uneven flames. Add it to your regular maintenance along with checking other Char-Broil grill low-flame parts like burners and regulators.
6. Clogged Main Burner
If you’ve already checked the fuel supply, the regulator, and air intakes, but your grill still isn’t heating properly, the next likely suspect is the burner itself.
This problem often happens when the main burner is clogged with grease, dirt, or even rust. Over time, food particles, cooking residue, and fat drippings collect around the burner ports. When those ports get blocked, gas can’t spread evenly, which weakens the flame and keeps temperatures low.
Another thing to keep in mind: if the grill has been sitting unused for a while, insects (especially spiders) can build nests inside the burner tubes. These blockages stop gas from flowing properly and cause weak or uneven flames. In extreme cases, they can even lead to flare-ups or small fires inside the grill.
Besides dirt buildup, poor alignment can also cause issues. If the carryover tubes between burners aren’t properly lined up, gas won’t flow evenly.
Similarly, the heat tents (the triangular covers above the burners) can cause problems if they’re heavily coated with grease or debris. Heat tents normally help distribute heat and enhance flavor by vaporizing drippings, but when they’re too dirty, they block heat and create uneven cooking.
The good news is that diagnosing clogged burners is fairly straightforward. Simply remove the cooking grates and flame shields to get a clear look at the burner ports. If they look dirty, corroded, or visibly blocked, there’s a strong chance this is what’s keeping your grill from reaching higher temperatures.
Solution:
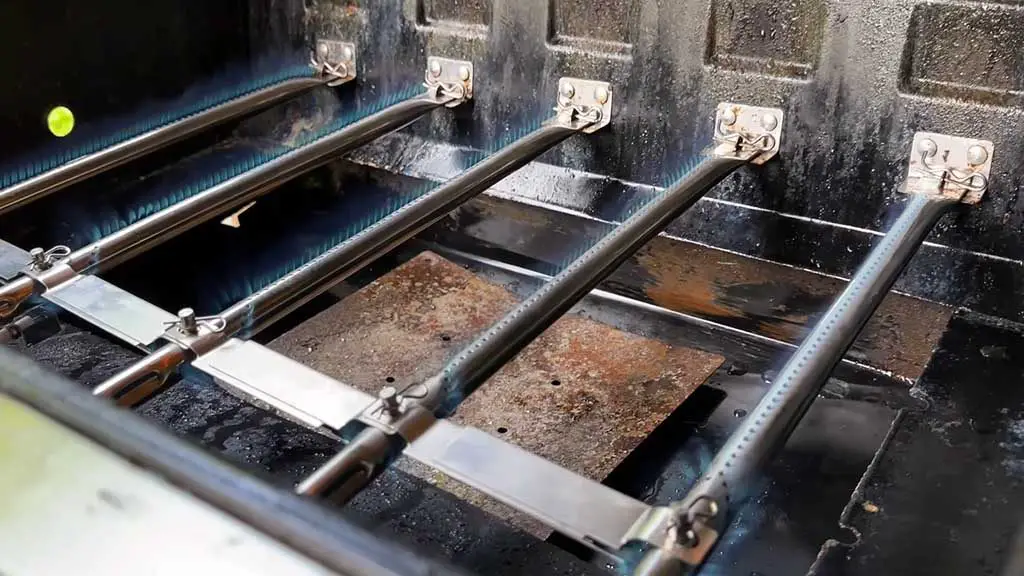
Fixing this problem usually comes down to a thorough cleaning. To start, take off the grates and flame shields to expose the burners. Most burners slide or lift out easily once uncovered. Once they’re accessible, use a grill brush to scrape away grease, rust, and food debris from the outside.
Next, clean the inside of the burner tubes. A bottle brush, pipe cleaner, or thin wire works well to break up any buildup. It’s common to find spiderwebsor hardened grease inside that block the flow of gas.
After that, run water through the burner to make sure all the ports are clear. You should see the water flowing evenly through each hole. If not, a pin or brush can be used to unclog them. When you’re done, let the burners dry completely before reinstalling them.
Once back in place, light the grill and test the flame. A strong, steady blue flame means the cleaning worked. Finally, check the triangular heat tents above the burners. If they’re greasy, give them a good scrape or brush. If they’re too rusted or dirty to be saved, replacing them is the best option.
In most cases, this cleaning process will restore the grill’s performance. But if the burners are severely rusted, damaged, or warped, replacement may be the only long-term solution. It doesn’t happen often, but it’s worth considering if cleaning doesn’t solve the problem.
7. Faulty Main Burner
If the flames on your Char-Broil grill are still weak and you’ve checked everything else, the issue may lie with the main burner itself. Since you’ve already checked for a clogged burner, now it could be due to the burner being completely worn out over time.
Burners mostly fail due to age or corrosion. Over the years, exposure to salt-heavy foods, high heat, and moisture can cause burners to rust, warp, or break down.
A bad burner often shows visible damage. Look for cracks, heavy rust, or pieces of metal breaking away from the burner tube. Another sign is uneven flame distribution. If part of the burner lights but other sections stay dark, the gas isn’t flowing properly through it.
You might also see flames that “lift” away from the ports or burn irregularly in patches, which indicates structural failure in the burner itself.
Another way to test is to compare the flames across all burners. If one burner consistently produces weak or uneven flames while others burn strongly, that’s a clear sign it has gone bad. In some cases, you’ll also hear unusual popping or hissing sounds as gas escapes through cracks instead of the burner ports.
Solution:
When this happens, no amount of cleaning will restore the original performance of the burner. Replacement becomes the only option.
How To Replace Char Broil Grill Burner
Here’s how you can do this using some easy steps:
Step 1 – Remove the Old Burners
Turn off the grill and shut the propane valve completely. Take off the cooking grates and lift out the flame tents (burner shields). Most burners are held by small clips or cotter pins at the back; use pliers to pull them out.
Some models have locking tabs you’ll need to twist. If a burner is connected to the igniter, carefully disconnect the wire before removing it.
Step 2 – Install The New Burners
Compare the new burners to the old ones to ensure the size and shape match. Exact replacements are ideal, but universal burners can work with small adjustments. Slide the burners into place, reconnect the igniter wire if necessary, and secure them with the clips or cotter pins.
Don’t forget to reinstall the carryover tubes so the flame can travel from one burner to the next.
Step 3 – Reassemble And Test the Grill
Put the flame tents and cooking grates back on top. Reconnect the propane tank, open the valve slowly, and light the grill.
You should see strong, steady blue flames across all burners. If the flames are still weak, double-check the alignment and connections. Once everything looks good, your grill should heat properly again.
You can also check out this video on burner replacement.
FAQs
Can weather affect my Char Broil grill flame?
Yes, cold temperatures or high winds can lower flame strength. Propane vaporizes more slowly in cold weather, while wind can disrupt the flame pattern. Always shield your grill from direct wind when cooking.
Can I use universal burners as replacements in a Char-Broil grill?
Yes, but fit and alignment are critical. Universal burners may need adjustments to sit securely. Exact Char-Broil replacements are best, but universal options work if carefully installed and tested.
How often should I inspect my Char-Broil grill burners?
Inspect burners at least twice per grilling season. Look for rust, cracks, or uneven flames. Regular checks help catch small problems early before they turn into low flame or heating issues.
Is it safe to cook if my Char-Broil grill flame is weak?
Cooking with a weak flame isn’t recommended. Food may not cook evenly or reach safe temperatures. Low flames can also indicate gas flow problems that could become hazardous if ignored.
Conclusion
Now you know what causes a Char-Broil grill low flame and exactly how to fix it. Start with the basics—fuel level and overfill—then rule out leaks. Reset the regulator, and replace it if needed. Clean the air intakes, then deep-clean the burners; swap any that are worn or damaged.
Follow the diagnostic order and you’ll restore strong, even heat without guesswork. Once your issue is solved, you can finally preheat, sear, and enjoy consistent results. If you’re facing Char-Broil burner problems, I have a dedicated guide on how you can solve them. Check it out!