Is your Traeger grill not getting hot enough? It happens most frequently due to the following reasons:
- Using pellets of inferior quality.
- The hot rod isn’t heating.
- A weak or faulty induction fan.
- The auger of the grill is jammed.
- A buildup of ashes in the firepot.
Apart from that, a faulty RTD probe and poor weather conditions can also cause this issue. Don’t worry, I’ll explain each of these issues in detail along with the right solution. So, let’s dive in!
Traeger Grill Not Getting Hot Enough [7 Easy Fixes]
I’ll talk about the main reasons behind your Traeger pellet grill not getting hot enough in this section.
01. Poor Quality Pellets
Bad pellets are the most common reason behind a Traeger grill not getting to high temp. There are many things that can go wrong with the pellets. Firstly, you should check if the grill has run out of pellets.
If there are no pellets, it’s obvious that the grill won’t get hot without pellets. Secondly, check if there’s a buildup of sawdust in the hopper and auger tube. That can also cause problems and result in the Traeger not getting hot.
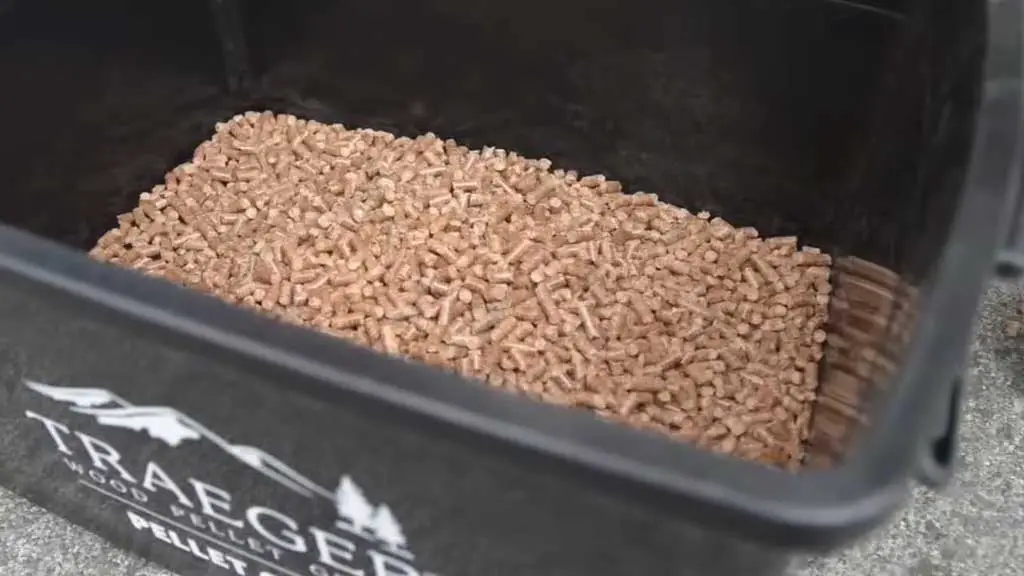
Running out of pellets is one thing, but using pellets of inferior quality is the real culprit behind a Trager grill not getting to the right temperature. When you use pellets that aren’t fully dry, it’ll cause a lot of problems, and the grill won’t be able to stay hot.
Even if you use pellets of good quality, not storing them in the right conditions can lead to disasters for your cooks. If the pellets aren’t stored in a dry environment where they’re not free from moisture, they can prevent the grill from getting hot.
Solution:
Firstly, vacuum the hopper and auger tube if you see a buildup of sawdust there. Getting rid of the sawdust will make sure that the pellets will burn efficiently. If the unit has run out of pellets, you need to refill them, and that should make the grill go hot once again.
How To Add Pellets Properly To Traeger Grill
After removing the bad-quality pellets, you can follow these steps to refill new pellets correctly in your grill:
- Add fresh pellets to the hopper.
- Prime the auger until pellets begin to drop into the firepot. How you should go about it depends on the model of your Traeger grill. But here’s a general overview of it:
- WiFIRE-enabled grills: On your controller, go to Select Auger > Prime Auger. Once pellets start falling into the firepot, select Done to deactivate the auger.
- Non-connected grills: On the grill controller, set the grill to High (or the maximum temperature) until pellets start dropping into the firepot.
- Reinstall all internal components back into their designated positions inside the grill (heat baffle, drip tray, and grill grates).
That’s how easy it is to add new pellets to your grill. Make sure that you follow the right process whenever you refill pellets into your grill. Don’t make the mistake of rushing through it.
If you’ve been using pellets of poor quality, remove them and get the right pellets for your grill. The distinguishing factor of high-quality pellets is that they have a nice shine to them and they make a snapping sound when they’re burned as they break.
How To Remove Poor Quality Pellets?
You already know about the right process for adding pellets. However, you should also follow the correct steps when removing the pellets. Doing these things makes sure that your grill functions well in the long run. Follow these steps to remove the pellets correctly:
Step 01 – Emptying The Hopper
Turn off the grill and empty the hopper. Removing pellets from your hopper is straightforward. There are three methods available, depending on your grill model. Make sure you always turn off the grill before you put your hands in the hopper and try to access it.
01. Pellet Slide: New Timberline grills are equipped with a pellet slide located just beneath the hopper. Position a bucket under the evacuation slide, pull the slide, and let all pellets flow into the bucket. To clean up any remaining pellets and sawdust from the hopper’s bottom and the auger tube, use a shop vacuum.
02. Pellet Door: If there’s a release door at the back of the hopper, place a bucket under it. Unscrew the lock, open the door, and let the pellets fall into the bucket. Use a wet-dry vacuum or your hands to clear out any leftover pellets or sawdust from both the hopper and the auger tube.
03. No Door or Slide: If your grill lacks a release door, remove the pellet guard in the hopper by unscrewing it. Use a small bucket or a similar tool to scoop out the pellets. Then, vacuum the hopper and the auger tube to get rid of the remaining pellets.
Step 02 – Priming The Grill
When troubleshooting your grill for issues, you should do some additional steps after removing the pellets. Remove all internal components from the grill, including the grill grate, drip tray, and heat baffle.
Plug in the grill and turn it on. Prime the auger to eliminate any remaining pellets that weren’t vacuumed out of the auger tube. Continue priming until pellets stop falling into the firepot. Turn off and unplug the grill. Use a wet-dry vacuum or your hands to clear all pellets and sawdust from the firepot.
That’s how you can correctly remove the pellets. Finally, make sure that you’re storing the pellets in a good environment. Using an airtight container is your best bet to protect the pellets from humidity and moisture.
Even if you’re using a new bag of pellets, make sure that they’ve not been exposed to humidity or moisture. Check the quality of the pellets before you put them in the hopper. If you make sure that you always do that, the Traeger not getting hot enough won’t be a problem for you anymore.
02. Traeger Hot Rod Not Heating Up
Another common reason why your Traeger grill isn’t heating up is a malfunctioning hot rod. The good news is that it’s easy to check whether this is the issue. When you do the test, the answer will be simple—the hot rod either works or it doesn’t.
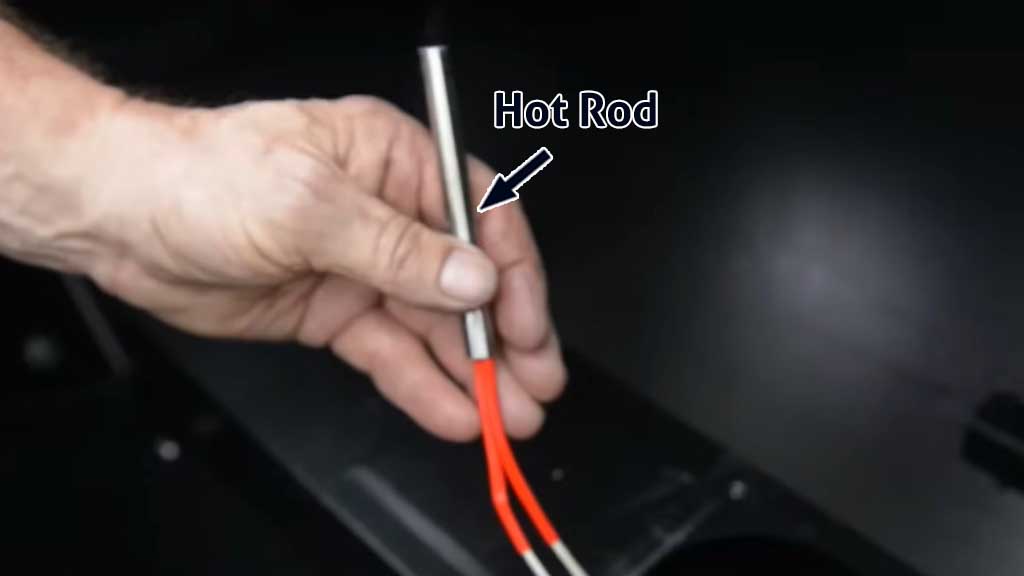
Remove the grill grates, drip tray, and heat baffle, and turn on the grill to the smoke setting. Place your hand over the firepot so that you can feel if the hot rod is working. However, be safe and make sure that you keep enough distance so that you don’t burn yourself.
If you can feel the heat, it means that the hot rod is working properly and it’s not the issue in your case. However, not getting any heat is a clear indication that the hot rod is faulty. It usually happens due to wiring damage.
Solution:
If your Traeger grill has a faulty hot rod, you’ll have to replace it so that your grill can get to your desired temperature. The Traeger hot rod replacement process is really easy if you know what you’re doing.
How To Replace Traeger Hot Rod
I’ve replaced a lot of hot rods and I’ve broken down the process into simple steps. If you follow them, you should have no problem replacing the hot rod on your own.
Step 01 – Remove The Hopper
Unplug the grill and disconnect it from the power source before you do any type of maintenance work on it. Remove the pellets from the hopper following the right procedure and unscrew the control panel.
Unscrew the front and back screws that connect the hopper with the grill. You’ll be able to take out the hopper. Slide it out gently making sure that none of the other components are damaged.
Step 02 – Disconnect The Hot Rod
Cut the zip ties on the wires and disconnect the purple and the RTD wires. The RTD wire is white. Turn your attention to the grill itself and remove the grill, drip pan, and baffle tray.

Step 03 – Remove The Old The Hot Rod
You’ll have to remove the firepot, and you can use a 1/4″ nutdriver to remove the screws holding it in place. Then, you should be able to take it out easily.
You should have access to the hot rod at this stage.
Carefully loosen the screw of the hot rod, but don’t entirely remove it yet. You should be able to glide the hot rod out of the firepot. If you can’t do it, loosen the screw more. Then remove the hot rod from the grill.
Step 04 – Place The New Hot Rod
Put the new hot rod in place of the old one. Start by inserting it from the hopper side and push it slowly to the firepot. Once it’s set in the right place, tighten the screw that you made loose to make sure that the hot rod stays in the correct position. Make sure you don’t overtighten the screw.
From there on, it’s a simple process of reverse-engineering the previous steps. Restore the firepot like it was and connect the other end of the hot rod to the control panel. Then, put the grill back together and you’ll have successfully completed the hot rod replacement process.
I believe that it’s an incredibly easy process and anyone can do it. However, if you don’t feel comfortable taking on this job yourself, there’s no harm in asking for help and contacting the Traeger customer support team. They’ll send out a technician who’ll complete this job in a jiffy and your grill will run properly.
03. Faulty Induction Fan
Still, wondering why your Traeger grill doesn’t get hot enough? The next thing you should look into is if your grill has a bad draft induction fan. It’s located underneath the hopper. Here’s a picture of it so that you can easily locate it and see if it works:

There’s an orange wire next to it. Turn on your grill and see if the fan is spinning. If it does, then it’s not the issue in this case. If it doesn’t spin, then this could potentially be the very reason behind your Traeger not getting above 350 degrees.
A common reason behind the fan not spinning is inactivity in using the grill. If you haven’t used the grill for a fair amount of time, grease, dirt, and sand can collect on it. That can be what prevents it from working properly.
Solution:
Give the fan a spin with your hand and see if you can get it to work again. If there’s a clear build-up of dirt, remove as much of it as you can using a soft brush or vacuum. Make sure you’re gentle during this process and don’t end up damaging the fan blades.
Another common reason why the fan does not spin is when wires interfere with the movement of the fan blades. If that’s the case with you and you see wires in the path of the fan blades, adjust the position of the wires. Hopefully, that’ll get the fan to spin properly and solve your problem.
Unfortunately, there’s always the possibility that the fan may be entirely faulty. In that case, your only option is to replace it with a new one.
Getting the fan to spin is really important because it manages the fire. More importantly, it creates convection inside the firepot which actually allows the food to cook properly. So, check your fan from time to time and make sure it’s working properly for the perfect cooks.
04. Auger Jam
Another reason behind the Traeger not heating up to 450 degrees is an auger jam. It’s the job of the auger to feed the pellets from the hopper to the firepot. If it’s jammed due to any reason, the pellets won’t be supplied to the firepot.

As they’re the main source of fuel behind the fire in your grill, it’s easy to understand why that would lead to your Traeger grill not heating up. Thankfully, it’s very easy to understand if this is the issue.
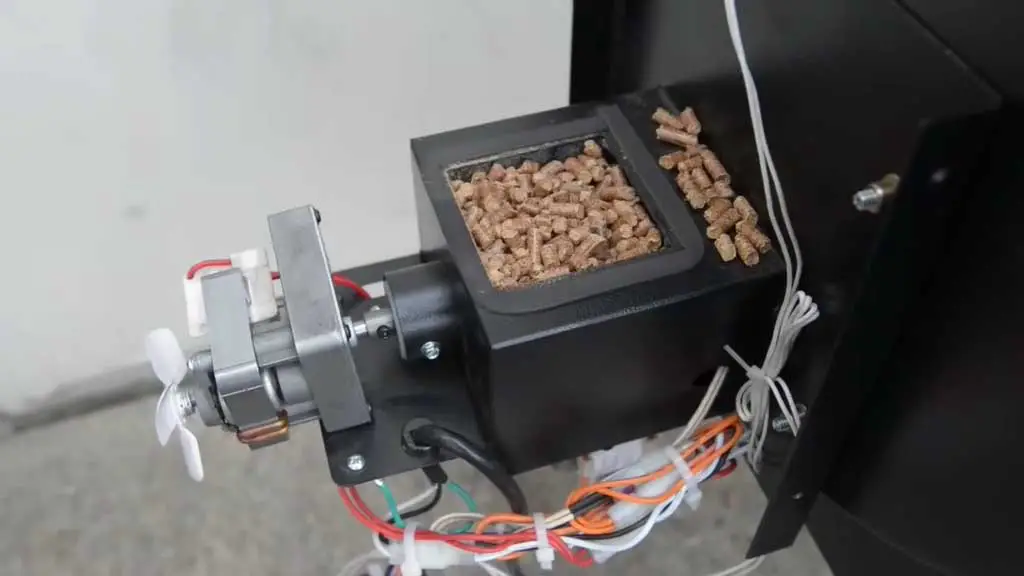
A good visual inspection will reveal whether the auger is jammed or not. If it’s jammed, you’d have to clean it. Besides that, take a look at the auger motor and see if it’s spinning. It’s located in the hopper and it’s the smaller fan. Here’s a picture of what it looks like:

If it’s spinning, that means the auger motor is fine. But if it doesn’t move at all, that means the motor is also faulty.
Solution:
You’d have to clear the auger jam so that the pellets can move freely from the hopper to the firepot. Don’t worry, it’s a really easy process to remove an auger jam and I’ve done it multiple times.
How To Clear A Traeger Grill Auger Jam
You’ll need the following tools to clean the auger jam in your Traeger grill:
- 7/64 Allen Key
- Pipe Wrench
- Flathead screwdriver
- Phillips screwdriver
- Pliers
- Hammer/Another Flat Object
Once you’ve got all of them, you can start the auger jam-clearing process by following these steps:
Step 01 – Access The Auger
Start by turning off the grill, unplugging it from the power outlet, and making sure that it has had enough time to cool down. Then, remove the four screws that hold the hopper in place.
Unscrew the screws that hold the control board in place so that you can remove the hopper. Once all that’s done, gently glide out the hopper. As you do it, place one hand under the hopper so that it doesn’t accidentally fall down.
Step 02 – Remove The Auger
Remove the shear pin that’s holding the auger motor to the auger shaft. Use your pliers to hold down the nut and use the Allen key to remove it. Then, you’ll be able to completely remove the motor from the shaft.
Remove the screw of the bushing next and use the pipe wrench to loosen the auger. Depending on the level of the jam, it may take a few tries to loosen it. Once it gets loose, you can remove the auger.
Step 03 – Clear The Auger Jam
Now get all the dirt out of the auger shaft. You can use the auger itself by pushing it in and out of a flat object like a hammer. Then, you can vacuum around the area to get out the maximum possible dirt.
Once you’ve cleaned out the auger shaft, put the auger back in. Then, put the grill back together, and hopefully, it’ll start to get hot enough for your cooks.
You can also check out this video on how to clear the auger jam.
05. Firepot Issues
Your grill needs to have the right amount of airflow to work properly. Too much or too little will hurt the cooking temperature. If the firepot is blocked due to the build-up of ashes, the airflow will be restricted. Hence, the firepot won’t get the proper heat required to cook optimally.

On the other hand, a firepot that’s rusty will have holes in it and may have too much airflow. It can cause very sudden fluctuations in the temperature making it too high or too low.
Solution:
Clean the ash out of the firepot to get a proper cook. By now, you should have a rock-solid idea of how to access the firepot. Once you do that, vacuum the firepot and get the dirt out of it.
Doing so will improve the airflow and get the temperature inside the grill hot enough for your cooks. Also, make sure that you utilize the air vents to maintain the proper airflow for you cooks.
However, if there are too many holes in the firepot, it’s of no use anymore. You have to replace it with a new one to ensure the correct airflow. Doing that will give you a much more consistent temperature throughout the cooks.
06. RTD Probe
The RTD probe reads the temperature inside the cooking chamber and sends the signal to the control board. This helps the control board determine how to keep supplying and burning pellets to maintain the cooking temperature.

However, if the RTD probe gives the wrong reading, it can mess up the sequence and quantity of burning the pellets. So, it’s possible that due to a bad RTD probe, your grill won’t get hot enough.
Solution:
It’s common for the RTD probe to malfunction when it’s dirty. So, you can try cleaning it so that it can take an accurate reading. Make sure it’s not broken down or angled towards the grill’s body as that can make the temperature fall.
If that doesn’t fix the issue for you, it’s possible that the probe has gone bad. In that case, you’ll have to replace it with a new one. Once you do that, you should have no issues in getting your grill up to temp.
07. Weather Conditions
One thing that for some reason people forget to into take account when it comes to cooks is the weather conditions. Whether you like it or not, the surrounding environment always has an impact on how your cook will turn out to be.
There are also certain things that you may be doing that can have a negative impact on the performance of the grill. For example, making these mistakes can lead to the grill not getting hot enough for your cooks:
- Incorrect shutdown cycle on the previous cook
- Using frozen or cold food
- Incorrect startup procedure
Solution:
Use the Traeger grill’s chimney cover to control the temperature. If you keep it tight, less air will go into the grill and that means that less heat will be generated. To get the highest amount of heat, it’s better to take off the cap or set it really high. You should tighten it only if there’s a strong wind.
Furthermore, you need to educate yourself on the right way to use your grill. You should always follow the right shutdown and startup procedure for all your cooks. Putting frozen food on the grill can cause the temperature to drop. So, make sure you avoid these mistakes to keep the temperature right.
FAQs:
When should you replace the pellets in a Traeger grill?
The tell-tale signs of the right time to replace the pellets are when they have no sheen, are dull, and can easily crumble. Besides, moisture in the pellet bag or clumps of sawdust are also indicators of replacing the pellets.
Why does the temperature fluctuate in my Traeger grill?
The two main reasons behind fluctuating temperatures in a Traeger grill are pellets with moisture in them or a dirty firepot. So, make sure you use high-quality pellets and that the firepot is free from ashes and dirt.
How long does it take for a Traeger grill to reach 350 degrees?
Preheating the grill is really important to increase the temperature quickly. The speed at which the grill reaches 350 degrees depends on the model. But most of them will do it in 20 to 30 minutes.
What is the ideal temperature to cook at with a Traeger grill?
It depends on the type of cook as a Traeger grill can be used for a lot of things. But for most cooks, a temperature between 225 and 450 degrees is going to be the right way to go.
Conclusion
Why is my Traeger grill not getting hot enough? By now, you should have a clear idea about it. None of these issues are very difficult to fix. You just need a little bit of patience and technical know-how to fix them.
Start by checking whether you’re using good quality pellets. Then, work your way to the other troubleshooting steps as shown in the guide. Hopefully, the grill not getting hot enough will no longer be an issue for you. I also have a guide on fixing an Oklahoma Joe pellet grill that’s not heating up.
