
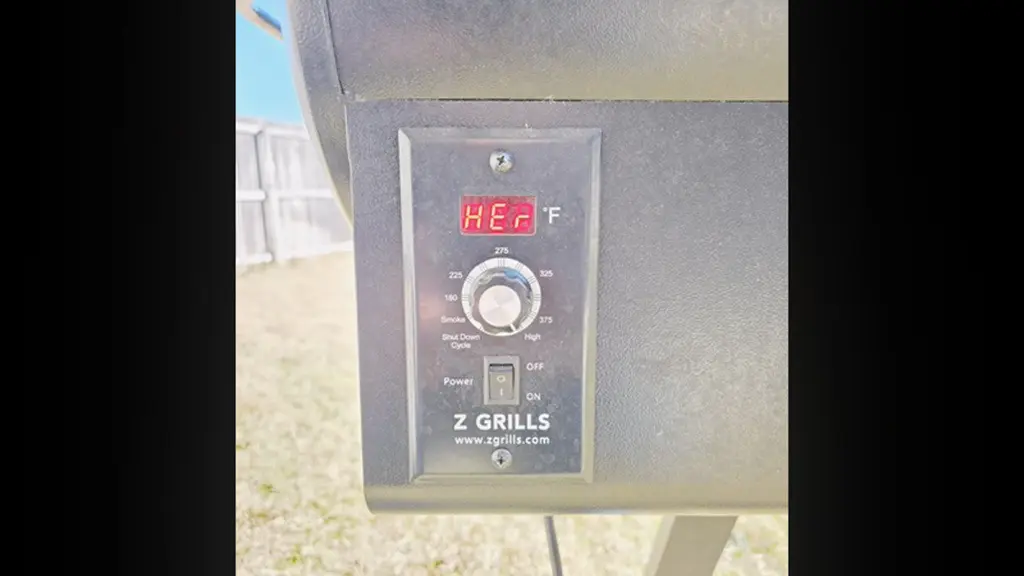
The Z Grills HEr Code pops up when the grill reaches temperatures of 550 degrees Fahrenheit for more than an hour. Essentially, it means a high-temperature error. The main reasons behind it are:
- Keeping the lid open for too long.
- Bad temperature probe wiring.
- Dirty or faulty temperature probe.
On top of that, there are also some other issues that can cause it. I’ll show you all possible reasons behind it and how you can fix it yourself without any further help. So, let’s dive in!
Z Grills HEr Code [Fully Solved]
The HEr code is one of the easier Z Grills error codes to fix because you immediately know what the problem is. All you have to do is find out the exact cause behind it and fix it. Here are the main reasons behind it and the fixes:
1. Keeping The Lid Open Too Long
I have seen this happen more times than I can count, and it usually surprises people. You open the lid to check the food, maybe flip something, maybe admire your work, and before you know it, the grill throws the dreaded HEr code.

It feels random, but it is not. When you leave the lid open too long, the grill reacts aggressively. The controller senses a temperature drop and starts feeding more pellets to recover heat.
The problem is that once you finally close the lid, all that extra fuel ignites at once. The temperature spikes hard and stays high longer than it should.
If that heat pushes past the safe limit and sits there, the controller steps in and shuts things down with the HEr code.
It is not accusing your grill of being broken. It is basically saying you stressed it out, and it is hitting the brakes to protect itself. This is especially common when you are running hotter cooks or when you leave the lid open while the grill is already near the upper temperature range.
The longer the lid stays open, the more aggressive the recovery gets. That’s the trap. But now that you’re aware of it, hopefully, you won’t make the mistake again in the future.
Solution:
The fix is simpler than most people expect, and you do not need tools, parts, or panic. First, let the grill cool down completely. Do not rush it. Give it time to come back to a safe temperature on its own.
Once it has cooled, turn the grill fully off. This clears the controller’s warning state. After that, restart the grill the right way to complete the Z Grills HEr code reset process.
Open the lid, power it back on, and set it to smoke so the ignition cycle can run cleanly. Let the fire establish itself properly instead of forcing the grill straight into a high-heat chase.
After you see that the grill is burning steadily, then you can dial in your cooking temperature. Close the lid and keep an eye on it as it stabilizes. Most of the time, the HEr code disappears as soon as the grill realizes everything is back in a normal range.
Going forward, your job is prevention. Keep the lid-open time short. Do what you need to do, then close it. If you know you will be working inside the grill for more than a moment, turn the temperature down first. That small habit saves you from big temperature spikes and unnecessary shutdowns.
The grill is not fragile. It just expects you to work with it instead of against it. Treat the lid like a quick checkpoint, not a viewing window, and the HEr code usually stays gone.
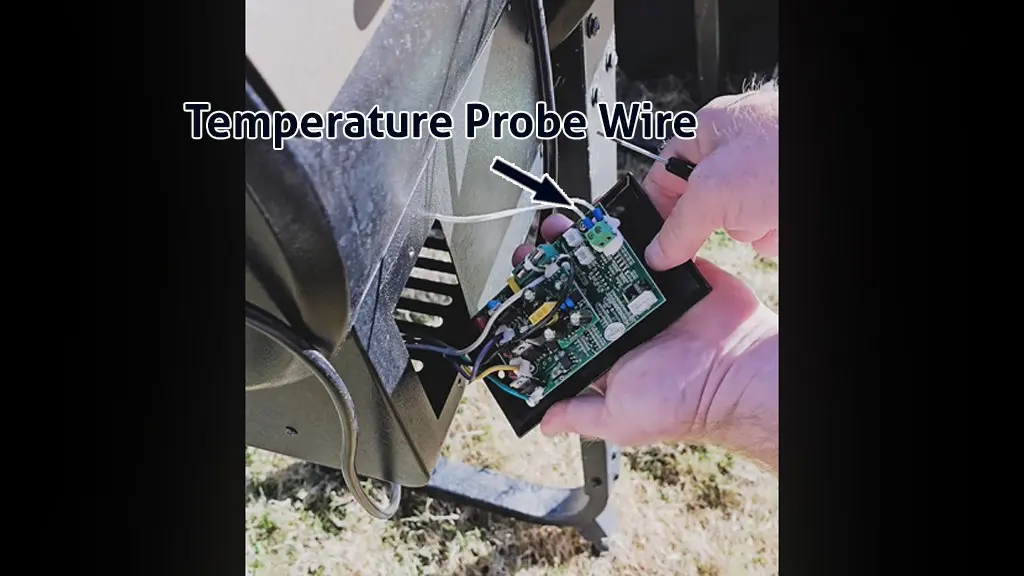
2. Loose Temperature Probe Wire
Another common reason behind the Z Grills smoker’s HEr code popping up is the temperature probe wire being loose. I have watched this one fool a lot of people because it looks like the grill has completely lost its mind.
You set the temperature to something reasonable, say 225, and instead of settling in, the auger just keeps feeding pellets like it is panicking. The temperature climbs, overshoots badly, sometimes drops suddenly, then shoots back up again. Eventually, the grill overheats and throws the HEr code.
What is happening is simple but sneaky. The controller relies entirely on the temperature probe to tell it what is going on inside the cook chamber. If that probe wire is loose, even slightly, the signal becomes unreliable.
The controller thinks the grill is cooler than it really is, so it keeps dumping pellets to compensate. Then the reading suddenly jumps, the heat is already out of control, and the safety system steps in with an HEr error.
This is why you might see wild temperature swings that make no sense. One second, it looks like the grill is at 400 plus; the next, it drops hundreds of degrees instantly.
That is not real temperature movement. That is bad information reaching the controller. When the controller cannot trust the data, regulation goes out the window, and overheating is almost guaranteed.
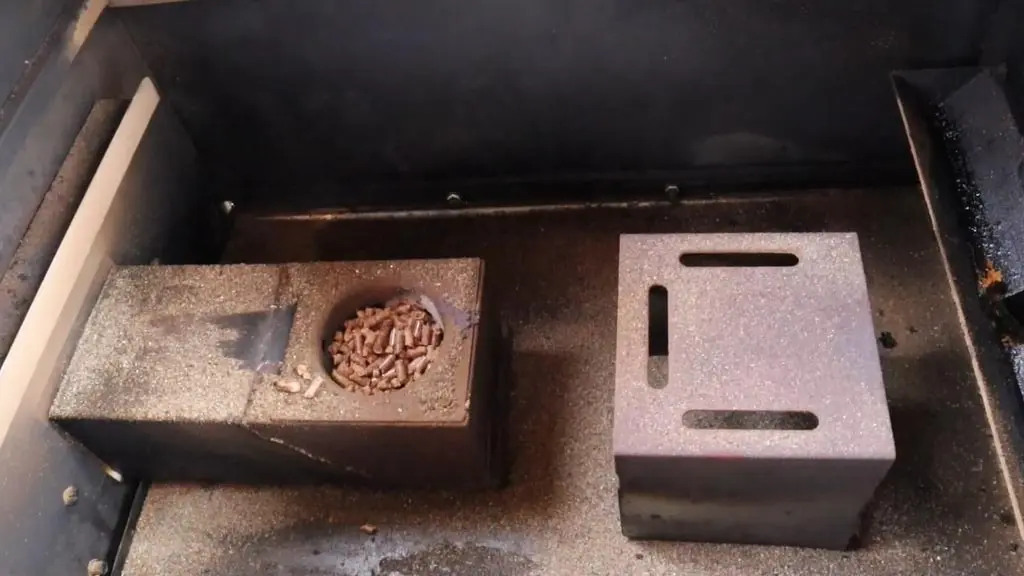
Another sneaky cause that creates the same “runaway heat” situation is cooking without the baffle over the firepot. I have seen people pull the baffle out for cleaning or tinkering, then forget to put it back in and shut the lid, as if nothing happened.
When the firepot is left exposed, a blast of super-hot air can hit the temperature sensor directly instead of being spread evenly around the cook chamber. The controller sees the sudden extreme heat at the sensor and throws the HEr code fast.
Even worse, running the grill with a naked firepot and the lid closed can scorch the inside of the drum and mess up the finish, so it is not just an “error code” issue; it can become a damage issue.
The only time I would ever run without the baffle is if you are using a cast-iron searing plate positioned right over the firepot for high-heat searing. Even then, you need to understand you are breaking the normal heat flow pattern, so HEr can still happen if the heat blasts the sensor unevenly.
Solution:
The first thing you should do is check the simplest failure point before assuming anything expensive is broken. Power the grill off and open the controller housing.
On the backside of the controller, you will see where the temperature probe wires are secured to the terminals. Those connections must be tight. Not just snug. Make sure that they’re tight.
If you find that the screws are loose, tighten them down firmly and give the wires a gentle tug to confirm they are seated properly. A loose connection here can absolutely cause runaway temperatures and HEr errors, and tightening it often brings the grill right back to normal behavior.
While you are troubleshooting, you also need to confirm that the heat baffle is installed correctly over the fire pot. If the baffle is missing or out of position, shut the grill down immediately and let it cool. Reinstall the baffle so it fully covers the firepot before restarting the grill.
This ensures heat is diffused evenly instead of blasting directly onto the temperature sensor.
Never run the grill with an exposed firepot and the lid closed. If you are intentionally running a cast iron searing plate over the firepot, understand that you are operating outside normal heat distribution, so keep cooks short and watch temperatures closely to avoid another HEr shutdown.
After tightening everything, close the controller, restart the grill properly, and watch how it behaves as it comes up to temperature. If the grill starts regulating smoothly instead of chasing heat, you found and fixed the problem.
If the issue continues, that usually points to other temperature probe issues rather than a loose wire. If that’s the case, then keep on reading, and I’ll show you how to fix it.
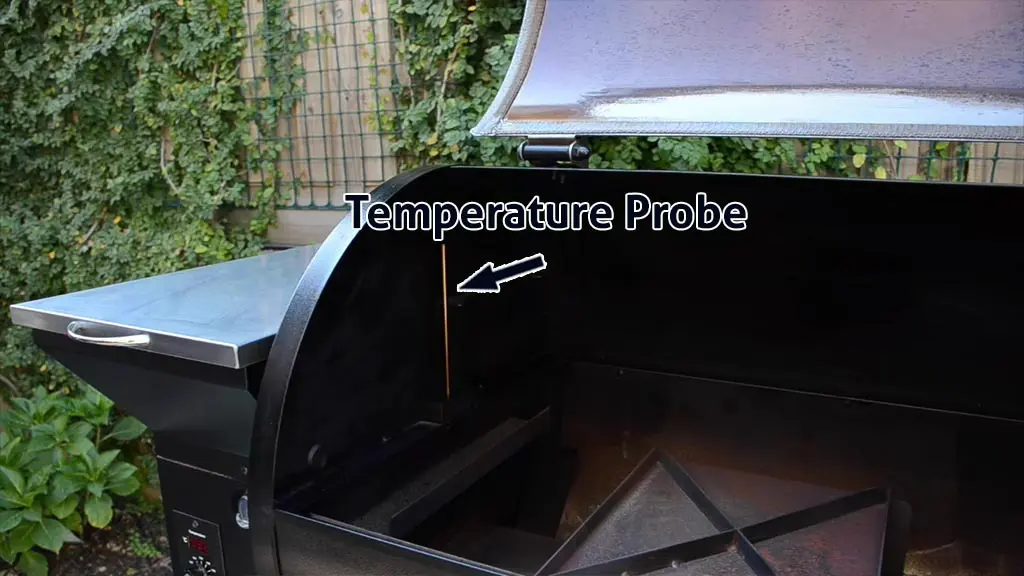
3. Temperature Probe Issues
The job of the temperature probe, as the name suggests, is to read the temperature. It then passes the information to the control board, and that reading determines how much heat to produce.
Now, when something goes wrong with the temperature probe, it’s usually one of these two things:
- The temperature probe is dirty.
- The temperature probe is faulty.
In any one of these cases, the reading will be completely messed up. The control board will get a high heat signal even when that’s not the reality. And that’ll prompt the Z Grills HEr error code.
Solution:
The fix depends on the problem. If the HEr code appeared due to a dirty RTD probe, it’s pretty easy to fix. Just give the temperature probe a good wipe down, and you’re good to go.
Just make sure that you clean off all the dirt from it so that it can get an accurate temperature reading. Note that the temperature probe can easily break if you bend it too hard. So, be gentle when you clean it—don’t act like a madman. Just use nice, subtle back-and-forth motions to clean it.
The other possibility is that the RTD probe is faulty. In that case, the only real option you have is to replace it. The good news is that this part is widely available, and if you contact Z Grills, they’ll send it out to you.
Now, it’s up to you whether you want to do the replacement yourself or hire a qualified technician to do it.
How To Replace A Faulty Temperature Probe?
Replacing the temperature probe sounds intimidating until you actually do it. Once you understand the flow of the probe wire and where it connects, the job becomes very straightforward. I always break it down into three big steps so you do not miss anything. Follow these steps to do it correctly:
Step 1 – Power Down and Expose the Temperature Sensor
Before you touch anything, unplug the grill completely. Do not rely on the power switch alone. You want zero power running through the controller while you work.
Next, empty the grill so you can see what you are doing. Pull out the cooking grates, grease tray, and heat deflector. This gives you clear access to the temperature probe mounted on the side wall of the cooking chamber. You will see it held in place by two small screws near the base.
At this point, locate the probe cable where it exits the grill drum. On newer 700 series and updated models, that cable plugs into a connector tucked between the hopper and the grill body.
On older models, the wire runs all the way into the controller. Either way, trace the cable visually before removing anything so you know exactly how it is routed.
Step 2 – Remove The Old Probe And Feed The Wire Out
Remove the two screws holding the probe inside the grill. Some units have small nuts behind the screws, so be careful not to drop or lose them.
Once the probe is loose, gently pull the cable through the hole in the grill wall. You may need to rotate the connector slightly to get it through the opening without forcing it.
If your grill uses a plug-style sensor, unplug it once the cable is free. If your model routes directly into the controller, open the controller housing and loosen the terminal screws holding the probe wires.
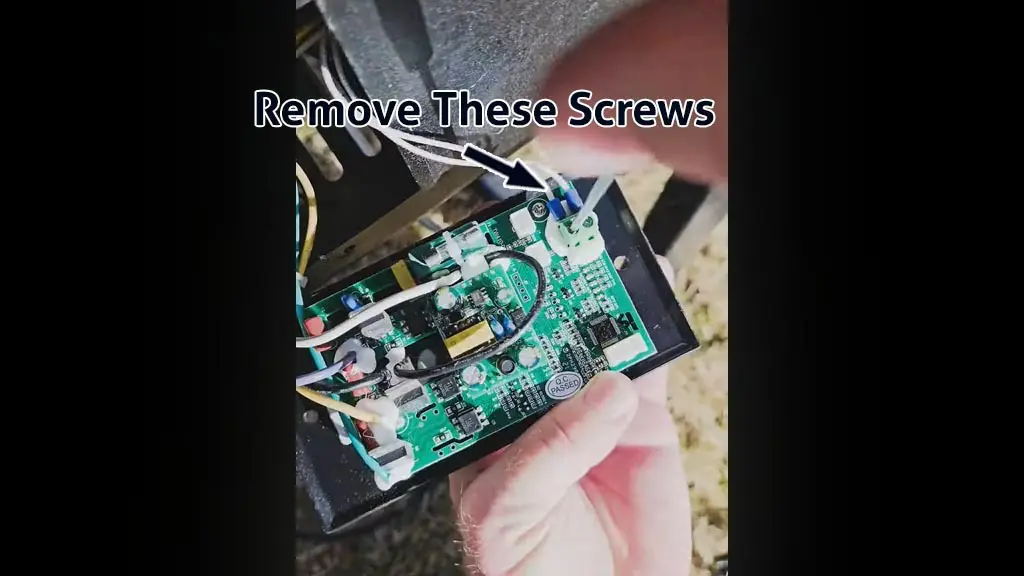
Then, pull the old probe wire out completely. Take note of insulation placement. Many replacement probes have a thicker insulation section that must sit outside the grill wall, not inside it. That detail matters because it protects the wire from heat damage over time.
Step 3 – Install The New Probe & Test The Grill
Installing the new probe is simply the reverse process, but this is where patience pays off. Feed the new probe wire through the same hole and routing path as the original. Make sure the probe sits with proper clearance from the grill wall so it is not touching metal directly.
Secure the probe with its screws, reconnect the cable or terminal block, and gently tug the wires to confirm everything is tight. Bundle any extra wire neatly and tuck it back between the hopper and grill body so it is not dangling near moving parts.
Once everything is reassembled, plug the grill back in and start it on smoke mode. Watch the temperature reading as it stabilizes. If the numbers climb smoothly and hold steady without wild swings, you did it right. From there, bring the grill up to a higher temperature and confirm it regulates normally.
If you were dealing with overheating errors or erratic readings before, this replacement usually fixes the problem immediately. Take your time, follow the wire path carefully, and you will have your Z Grill reading accurately and running the way it should again.
4. Feed System Issues
Now, the issues that I’ll mention in this section aren’t likely and are very rare. But I’ve seen it from time to time, and since I want this to be a comprehensive guide for the Z Grills HEr code fix, I want you to know about them.
If the temperature reading is actually getting really high even when you’re not setting up, something is wrong with the system. For some reason, the heater is feeding the grill more pellets.
How would you know if that’s the case? Easy—just check with an external thermometer if the temperature reading is as high as the one in the grill says. If they’re close to each other, then it means the temperature probe isn’t faulty. The grill is actually being overheated.
So, what causes it? In my experience, the most common reason behind it is the buildup of ash. When the firebox is dirty and all clogged up, the heat has nowhere to escape. So, the grill becomes overheated very easily.
If the grill is clean, then the only other explanation is that the controller is faulty. Clearly, it’s feeding pellets to the grill when it’s not supposed to.
Solution:
Start by cleaning the grill. It’s an easy thing to do, and if the issue is being caused by a dirty firebox, you’ll know it after the cleanup job. Make sure to remove all ash, dirt, and grime buildup.
Then, restart the grill following the right setup procedure. Then, see if Z Grills’ HEr code appears anymore. If it doesn’t, then congratulations, you’ve solved the issue. But if not, then the control board is faulty, and the only solution to fix this issue is to replace it.
How To Cook With A Faulty Temperature Probe?
I will be very clear with you upfront. This is not the ideal way to run your grill, and it is not something I recommend as a permanent solution unless you absolutely choose to.
But if your temperature probe has failed, a replacement is on the way, and you still need to cook right now, there is a reliable workaround that can get you through. I have used this method when stopping a cook was not an option. It works because of how Z Grills measures temperature behind the scenes.
The key thing you need to understand is that the food probes that plug into the front of your controller are built on the same sensing technology as the main grill temperature probe.
The controller does not care where the temperature signal comes from, as long as it gets one. That gives you a way to temporarily “trick” the grill into behaving normally. Here is how you do it safely and correctly:
First, unplug the grill completely. Do not work on live power. Locate the grill’s temperature probe wire.
If your model has a connector in the middle of the cable, cut the probe wire on the grill side of that connector, leaving enough length to strip the insulation. If your grill does not have a mid-cable plug, cut the probe wire somewhere in the middle so you have room to work.
Next, take one of your food probes and cut it near the plug end. Strip the insulation off both the grill probe wires and the food probe wires until you see clean metal.
There is no polarity here, so you do not need to worry about matching positives or negatives. Twist one food probe wire to one grill probe wire, then twist the other pair together.
Once twisted, insulate each connection thoroughly with electrical tape. Do not rush this step. Exposed wire near heat is asking for trouble.
After that, reconnect the temperature sensor cable to the controller if your grill uses a plug.
Now comes the important placement step. The food probe tip is now acting as your grill’s temperature sensor. You need to place it where it can read air temperature, not meat temperature.
I usually position it tip-to-tip with the original probe location or rest it on the far-left side of the top rack, where it is exposed to circulating heat but not direct flame. At this point, you can start the grill normally.
The controller will read temperature from the food probe and regulate pellets just like it would with the original sensor. In most cases, the grill will hold temperature surprisingly well, and you can finish your cook without HEr errors or runaway heat.
You still need to stay alert. I always recommend keeping an external thermometer in the chamber so you can sanity-check the readings. This setup is good enough to get you through an essential cook, but it is not an excuse to walk away and forget about it.
Bottom line: If cooking cannot wait, this method keeps you in control instead of shutting you down. Just respect that you are operating in emergency mode, pay attention, and finish the cook cleanly.
FAQs
Can extreme weather cause the Z Grills HEr code?
This is very rare, but yes. Extremely hot ambient temperatures or direct sunlight on the grill can push internal temps higher than expected, increasing the risk of an HEr shutdown during high-heat cooks.
Does pellet quality affect HEr errors?
Absolutely. Cheap or dusty pellets burn inconsistently and can cause sudden heat surges, making temperature regulation harder and increasing the chance of overheating errors.
Will running the grill empty increase the risk of HEr?
It can happen in a few cases. With no food absorbing heat, temperatures rise faster and overshoot more easily, especially during high-temperature settings or long preheats.
Does opening the lid repeatedly cause HEr errors?
Frequent lid openings confuse the controller into overfeeding pellets repeatedly, increasing the risk of heat spikes once the lid stays closed again.
Conclusion
Now, you know the main reasons behind the Z Grills HEr Code and how you can fix it. Nine times out of ten, it happens due to a faulty RTD probe, more commonly known as the Z Grills temperature sensor. When you replace it, the HEr code should disappear for good.
But if it’s caused by any other issues, the other points in the guide should help you fix it on your own. I also have a dedicated guide on fixing the ER2 code in Z Grills. Check it out if you ever face that issue. Cheers!